First of all, John is a mensch of a guy who made commissioning a piece of art into a really cool and eminently bloggable experience. He took a ton of pictures along the way and wrote a ton about the entire process so what follows will be my first guest blogger!
Note: there are a few asides from yours truly along the way so, if you're a stained glass scholar who stumbled here through some internet wormhole, you'll have to bear with the ramblings of this blog's rambunctious proprietor. This was such a fun process and I couldn't help myself. Without further adieu:
How to Build a Piece of Stained Glass Art for a Composer
by John Hanson
My first stab at a design. This was meant only to show the glass colors I intended to use. (John and I changed it a little after this...cut out the blue and adjusted some proportions.)

I have developed a habit of making a scale "cartoon" of new designs using colored pencils which lets me see how the composition and colors balance out.

I make two black and white copies of the previous template. One is used to cut out the pattern pieces and the other is used for layout of the cut glass and construction of the window. (It took me a second to figure out what he was saying here but, upon further inspection, it turns out that one of them is cut up as a template for the individual pieces while the other is used as a template for assembling the finished product.)

Glass has a three-dimensional structure much like the X, Y and Z axes we struggled to comprehend in geometry class. (Or--if you're me--really, really struggled and essentially gave up on.) When it is cut or scored it will break along the score line very neatly. The pliers shown are grozier pliers and are pretty much unchanged over the thousand years or so that stained glass making has occurred.

A grinder coated in synthetic diamond (cool!) serves to rough up the edges for taping. A grinding spindle rotates on a motor shaft driven from below and the open grill sits in a pool of water. The sponge behind the grinding shaft draws water up to keep the grinder cool while the glass dust it generates becomes wet and falls through the grill and collects in the water. Many of the early glass artists used dry grinding wheels, breathed in huge amounts of this dust and later suffered horrible lung diseases. (Cheers to John for including the grisly details.)

Tracing a pattern piece: each one is laid on top of the glass and the outline is traced with a black Sharpie marker. This guides me in accurately cutting the edges of each piece.

Glass cutting came to me very easily. My first instructor made a strong point of teaching us to "reduce the volume" of a piece as we cut it. (It should be noted here that John is apparently the type of guy who said to himself one day, "I really wish I knew how to make a stained glass window" and then just went out and did it...and that is way cool.) Instead of trying to make a single cut around a curved line we were taught to make a series of concentric cuts outside the pattern edge, leaving a small area of glass for the final cut. This dramatically reduces the chance of the piece fracturing in the wrong spot (this can often happen when making curved cuts). When the final score is made along the black outline, the glass is literally pulled away with the grozier pliers and never snapped off.

Grinding the edge of the glass: when using copper foil, the edges of every piece of glass must be lightly ground. This has the added benefit of dulling the sharp edge created by the cutting process which saves blood and fingertips when holding all this glass.


Grinding the edge of the glass: when using copper foil, the edges of every piece of glass must be lightly ground. This has the added benefit of dulling the sharp edge created by the cutting process which saves blood and fingertips when holding all this glass.

The use of copper foil around the edges of the pieces is widely attributed to Louis Tiffany. However, this is mainly because he stole it from an employee he later fired and the artisans he had making the pieces used it extensively thereafter. (Cheers for including some stained glass gossip! I looked up Tiffany and he has one of the best middle names ever.) The wooden object is called a "fid" and is run across the tape on the edges and the sides of the glass to smooth it out and make it adhere better.

The 7/32" wide tape is centered on the edge of the glass and leaves an overhang of about 1/16" on either side. I then run my fingers along the overhang to form the edge seam used to solder the glass together.


The 7/32" wide tape is centered on the edge of the glass and leaves an overhang of about 1/16" on either side. I then run my fingers along the overhang to form the edge seam used to solder the glass together.

After cutting and taping all the pieces I add the last two sides of aluminum angle iron to hold everything together while I solder the seams. Every one is covered with solder that is 60% tin and 40% lead and melted on with an electric soldering iron. (Just out of curiousity, why is a word pronounced "saw-der" spelled "solder"? That makes absolutely no sense to me. It comes from Middle English and French so who knows.)

The completed window. There are five different kinds of glass in the piece (some of which was salvaged from a demolished church in South Dakota and is over 100 years old).


After this part of the process the solder is bright silver so the next thing to do is treat it with a chemical patina which reacts with the lead and turns it almost black and simulates the aging and putty process of traditional glass. I then polish the entire piece with a special (and very expensive) stained glass polish.

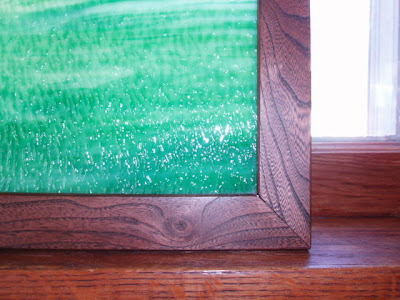
I frame all my work with wood because it gives the glass a completed look that is lacking when the zinc edge is left exposed.
I am fortunate to have a good supply of 200-year-old American Chestnut that was salvaged from a demolished barn. This particular tree was the victim of one of the earliest environmental disasters to occur in America.

I am fortunate to have a good supply of 200-year-old American Chestnut that was salvaged from a demolished barn. This particular tree was the victim of one of the earliest environmental disasters to occur in America.
In the 19th century there were billions of chestnut trees ranging from the Appalachian Mountains to the western border of Wisconsin. Sometime in the 1880s, Japanese Chestnuts were introduced to northwestern America and, unfortunately, they carried a blight. (I checked on this, by the way. It was a fungus.) The native chestnuts had no resistance to this disease and, by 1940, almost every one of them had died. These trees--related to the Oak--grew to be over 100 feet tall and 10 feet in diameter and, as they were felled, the lumber was used to build barns, warehouses and even coffins. As these old buildings are being torn down the wood is becoming available at a very high price (an 8-foot long 2x4 of American Chestnut can cost $300).
When stained with a dark, coffee-colored stain the grain revealed is unlike anything you can imagine. It's got a very defined, striated grain and, when cut like quarter sawn oak, the grain appears to be filled with miniature bolts of lightning.

The completed window. There are five different kinds of glass in the piece (some of which was salvaged from a demolished church in South Dakota and is over 100 years old).

So, there it is. That's simultaneously my very first guest blog as well as my first experience commissioning a piece of visual art. It certainly won't be the last of either of those things.
2 comments:
Hey, Josh
Yesterday afternoon I was at a concert of John's other choir, St. Paul Vocal Forum, for which he also donates stained glass. He had made 2 (smaller) copies of this design for those concerts. I guess the previous night his aunt's and uncle's names were drawn as winners. He joked about that before right before drawing my name! Part of the reason I decided to "throw in" to the drawing was because I thought it would be cool to have a copy of a piece that you had commissioned. Lucky ME!
Linda Neuman, also of Summer Singers
Hi all. How are you?
Post a Comment